Tuesday 29 January 2008

A rustic take on chocolate brownies

How much do you love chocolate?

(Don't shout! Don't shout! Come on...it was a rhetoric question!)

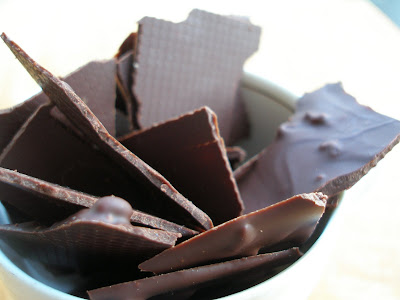
I've never been a champion at munching chocolate by chunks. Well, I'd like to nibble on some flavoured chocolate or have chocolate omelette for breakfast from time to time, but a cheesecake/apple cake/another good cake will always stand above chocolate cakes in my top 10.

Regular chocolate cakes don't really attract me that much, BUT I'm momentarily sold when I see something different. It has to be different different. It has to confuse my taste buds before I've even read through the recipe. This cake, my darlings, qualified enough to spend time at the back door of my mind for a long time.

It's a brownie recipe that uses barley flour as the only flour. I wouldn't have believed it could work out so well without all the fancy gluten. But it did. It's a cake that bloody could. Barley flour's got my soul now!

Chocolate brownies with barley flour
(Estonian magazine Oma maitse )

200 g butter
150 g dark chocolate
2 dl coarsely chopped walnuts
1 dl dried cranberries or cherries
3 eggs
2 dl sugar
2 dl barley flour
  1. Melt butter in a saucepan and add chocolate chunks. Stir over low heat until incorporated well. Remove from heat.
  2. Beat the eggs with sugar with an electric mixer until stiff.
  3. Add the chocolate mixture, whisking, then add the flour and chopped walnuts and berries (if using cherries, cut them into two). Mix carefully.
  4. Bake at once in a greased baking pan at 180 for 20-30 minutes (I used a 24 cm pan).
  5. Let cool before serving.


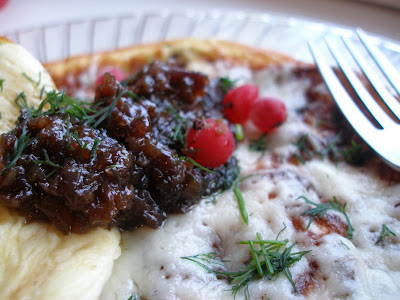
The cake is, essentially, a brownie full of deep chocolate taste, but isn't as smooth as usually, but a bit grainy inside. Barley flour gives it a more crumbly texture and an intense, a bit rustic flavour that suits so well with walnuts. Dried cherries or cranberries add sweetness, but aren't very recognizable on the whole.

I found a most suitable way for completing the taste of the cake by adding some neat slightly flavoured cream.


Cinnamon-vanilla cream topping

1 dl heavy cream
100 g cream cheese
1/4 tsp ground cinnamon
2 tsp sugar
vanilla
pinch of salt
  1. Combine cream cheese, sugar, cinnamon, vanilla and salt in a bowl, beat with an electric mixer until fluffy.
  2. Add heavy cream and beat some more until you reach your desired consistency.
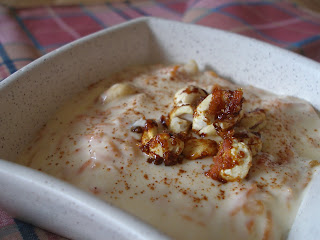
The cream completes the strong flavour of the cake perfectly and creates a fluffy contrast with the dense chocolate brownie. The flavour itself is kind of a shadow of a flavour, but this is the aim here - to let all the rustic delight stand out.

Right now I'd say I love chocolate pretty much!:)

Wednesday 23 January 2008

A delicious way of killing your cold

Usually people catch a cold. But, no, not me. I have a cold. Be it summer, be it winter, I've almost always got a runny nose. So I especially should try and eat myself healthy.

On Tuesday I made another try. I found myself eating a whole head of garlic! Yes, a whole head!:) But before you judge me and run away, consider this - it was a delicious way of getting better!

Oven baked garlic, my friends, has a wonderful scent.

Oven baked garlic
(from "Küüslauguraamat", serves 4)

4 heads of garlic
olive oil
salt
(dried herbs to your liking)
  1. Cover a baking sheet with parchment paper.
  2. Without peeling them, cut the garlic heads into two and place on the baking sheet (the cut side up)
  3. Drizzle the garlic with olive oil and sprinkle with salt. Add any herbs you want.
  4. Bake at 200C for 20 minutes
It's best to eat the garlic while it's still warm. This way the cloves are quite mushy and are easy to mash with a knife, but they get firmer as they cool. Just slip the cloves out of their peels and serve over crispy bread. Or go fancy and add them to a salad or serve beside a meat dish. I plan to make a cream cheese spread with them soon, I'm sure of that. So what your fingers get a bit oily - lick them clean! The oil's flavoured with the delicious deep flavour of the garlic. The taste is mainly 'roasted', but there's a 'healthy' moment in the mouth too. It's all mushy. It's good.

I'd already made the recipe when I discovered the event Think spice...garlic hosted by Sunita. What a timing! This is my contribution - as garlicky as it gets:)

Sunday 20 January 2008

My favourite quick carrot soup

You say 'pureed soup' - I think 'carrot soup with coriander and aniseed'

For me, it's the quintessence of pureed soup, it's a liquid dream, it's the warm comfort of a cold evening, the cooling pleasure of a hot afternoon. It's versatile, it's under my skin.


I've almost always got organic carrots in the fridge that we've grown ourselves. They're full of taste and have got a homely flavour. Making this soup is very easy and, fortunately, someone has usually peeled the carrots before I get my hands on them:) In wintertime, it's great to enjoy it warm, but it's just as wonderful when eaten cold. I especially love that during summertime! We do have 1-2 weeks of hot weather here!;)

Chicken broth can be replaced by vegetable broth, heavy cream or sour cream can be used in place of cream cheese. Whatever you've got handy! Cream cheese can also be flavoured with herbs /onion/garlic/whatnot.

Carrot soup with coriander and aniseed
(serves 4)

400 g carrots
1 onion
1 tbsp butter
8 dl chicken broth
ground coriander seeds
ground aniseed
4 tbsp cream cheese
1 tsp sugar
salt, pepper
  1. Slice the onion and the carrots, sautee in butter in a saucepan until onion is transparent, about 10 minutes.
  2. Add the broth and boil until carrots have turned quite tender, 20 minutes will do fine.
  3. Puree the potful, then return to the saucepan.
  4. Add cream cheese and flavour with coriander, aniseed, salt (if needed), pepper and sugar to taste. Heat, but don't let the soup reach boiling point.
The soup is creamy, even a little portion of cream cheese does wonders! The flavour of carrots is sweetish, but the spices push it to a limit. Coriander and aniseed are not very strong flavourers, they're rather mild, so they suit carrot perfectly. What pleasure!

This time I served the soup with some crispy rye bread cubes, but it's equally good with white bread cubes or grilled chicken. More often than not I like to eat it plainly, without a topping, because the soup itself completes the taste. That sounds weird enough:)

So I guess it's also the perfect recipe for this month's Monthly mingle, themed Comfort foods. Although it's not something from my childhood or anything I'd eat together with my family, I'm sure this soup will guide me through the best and worst moments of the life still ahead of me:D

Wednesday 16 January 2008

Cream cheese ice cream

Cream cheese, just like my favourite - curd cheese - makes everything better.

I adapted the recipe from the lovely Tartelette, my step-parent in the Adopt a blogger event. She's great! I've enjoyed reading her blog for several several months now and in addition to her professional photos I like her attitude towards cooking.
Actually I made this ice cream quite some time ago, but it looks like the event was timed perfectly before me writing about it...

But I did not dare call it cheesecake ice cream. What would make it cheesecake ice cream for me? First - for me cheesecake is primarily baked cheesecake. Could I make an ice cream that tastes like that? Amy suggested adding chunks of it. In case you're wondering, I'm drooling right now:) So - more cream cheese into the ice cream, chunks of baked cheesecake and chunks of cookies too. I'm up for the challenge!

But for now, I recommend this - mouthwatering!

Cream cheese ice cream
(adapted from Tartelette, serves 4-6)

4 dl milk
1 1/2 dl heavy cream
1 3/4 dl sugar
2 egg yolks
90 g cream cheese
  1. Whisk the egg yolks with the sugar
  2. In a saucepan over medium heat, warm up the milk and the cream, then slowly pour a small amount on the egg yolks to temper, then add the remaining part.
  3. Stir the mixture well and pour it back into the saucepan, cook over medium-low heat until the cream thickens. Don't let it reach the boiling point!
  4. Remove from heat and whisk in the cream cheese (It's easier to do so if you first add some of the mixture to the cream cheese so it's not so solid).
  5. Cool the mixture to room temperature. Then cover and refrigerate until cold. Process in an ice cream maker or beat with an electric mixer every 30 min-1 hour (depending on the freezer's temperature - just check your ice cream!) until the consistency is right.

I really was pleased with the result, considering I'm an ice cream amateur. This time I got the consistency right, at least:)

There's cream cheese flavour, alright, but I'm greedy for more! It's sweet, yes, creamy, mild, perfect with a sour pie. It tastes...jolly. It's an amusement park ice cream with a small hint of upper class.
Now, I'm making myself a schedule for WHEN there's time for another batch of cream cheese cheesecake ice cream!

Sunday 13 January 2008

Layered cake with prunes, walnuts and a cream that will cause many 'oohs', 'aahs' and 'I-didn't-know-that-was-comings'.

A position of honour (at least by me) on our kitchen shelf belongs to the book 'Eesti kokkade kokaraamat' which contains recipes composed by 26 Estonian chefs. These range from simpler recipes to Barbeque entrecote with basil marshmallow, ginger-hoisin sauce and roasted tomato seeds (just a sidemark: can you imagine that?).

This cake is adapted from the creation of Maren Rits, the chef of restaurant 'Postipoiss' and is unique for its use of Merevaik, an Estonian creamy processed cheese.

As my springform pan is 27 cm, I only cut the cake into 2 layers, although the recipe said 4 (how small does a pan have to be?). I also reduced the amount of prunes by half as there didn't seem to be much more room for them, but feel free to add as much as you like. And I didn't use muscovado and demerara sugar...but substituted with what I had.

Layered cake with prunes
(adapted from Maren Rits's recipe in 'Eesti Kokkade Kokaraamat")

130 g butter, room temperature
230 g light muscovado (I substituted with 180 g regular sugar + 50 g soft brown sugar)
3 eggs
100 g flour
1 tsp baking powder

400 g prunes (I used 200 g), chopped
100 g walnuts, chopped
2 tbsp demerara sugar (I left out)

200g sweet condensed milk
400 g creamy processed cheese (i.e. Estonian Merevaik)
100 g light syrup
  1. Slightly beat the eggs with sugar, add butter and beat with an electric mixer until fluffy.
  2. Add flour mixed with baking powder.
  3. Bake in a springform pan at 180C for about 25 minutes.
  4. Let the cake cool down and cut into layers (2-4) depending on the thickness of the cake.
  5. Beat condensed milk, processed cheese and sugar syrup together with an electric mixer until incorporated well.
  6. Spread the mixture between layers and on top of the cake, sprinkling prunes, walnuts and demerara sugar on the cream.
  7. Let the cake stand overnight, serve on the next day for best results.


Now that's one sweet cake! Although it turned out looking quite different from the photo in the book, we really liked it. The cream tastes more of condensed milk than of the cheese, but the processed cheese definitely gives the cream an intense flavour, the source of which is very hard to detect, and makes it a bit sticky. Between the layers the cream is soft, but on top of the cake it has become thick and looks a bit like sugar icing.

The cake, the cream, the prunes and the nuts - there are so different textures together in every bite that it's just pure pleasure! With only 200 g of prunes there was a piece of them in almost every bite and that was enough for us. The overall sweetness (quite overwhelming!) is counterbalanced only by the slightly bitter walnuts. I didn't sprinkle any sugar between the layers - the cake certainly does not need more sweetness, but I believe 2 tbsp of demerara sugar would rather serve as a flavour nuance and crunchy bits in a cake that is generally very soft.

For a drink alongside the cake I'd recommend cold milk. I guess strong coffee could work as well (not that I ever drink it, of course!).

Thursday 10 January 2008

Fennel and pear soup

I guess you all have some dishes you make just for yourselves. Maybe you mix together a chocolate dessert when home alone, maybe you have your special sandwich that everyone stares with a you're-really-eating-that face while you're at it.

For me the lonely dishes are pureed soups. Yes, really. My mother refers to them as baby food. My father...well he rather has a problem with what I put into the soups. Or...into almost any savoury dish.

The soups may be lonely, but...at least I can have the whole potful for myself. I must thank Janelle of Let's talk of tomatoes for this lovely soup - half the amount made a good portion of warm food for two days:)


Fennel and pear soup
(Talk of Tomatoes, serves 6)

2 bulbs fennel
1 onion
2 (comice) pears
2 tbsp butter
9 dl chicken broth
2 tbsp flour
salt, white pepper, sugar
1 dl light cream

  1. Trim the base and stalks of fennel, thinly slice bulb. Do the same with the onion.
  2. Add fennel, onion, butter and 2 tbsp water into your soup pot. Cover and cook over medium heat for 5-7 minutes.
  3. Add 2 tbsp flour, heat stirring for 1 minute.
  4. Add peeled and chopped pears and broth. Cover and simmer until pears are soft, for 5 minutes.
  5. Puree the potful (You can leave some of the soup as it is to have some pices in it).
  6. Return the soup to the pot, add cream and flavour with salt, white pepper and a bit of sugar.
  7. Simmer 6-8 minutes, serve. (optional garnish: fennel fronds).

The more I ate, the more I liked it. When the soup reached a kind of moderately warm temperature, I decided to start loving it. The obvious wonderful flavour of fennel in creamy consistency, supported by the faint presence of pears. If I hadn't known there were pears in the soup, I probably wouldn't have guessed the 'secret ingredient', but they do deserve the name 'secret ingredient', as they seem to somehow bring out the best in fennels.

Do add a bit of sugar! Although there are pears in the soup the sweetness - on the whole - needs your tiny support. The soup tastes good when it's cooled down too, but I'd still recommend this 'moderately warm' temperature - it'll wake up your taste buds!

Tuesday 8 January 2008

Spicy chocolate truffles, if you still miss Christmas

A part of my holiday gifts were these spicy chocolate truffles. They were a bit different from truffles I'd made before because the filling was softer, silkier. With 2007 and all the Christmas mumbojumbo gone, spicy desserts still make their appearances in our kitchen. All year round, actually, all year round...


So for me any time is right for writing about a truffle with a taste of Christmas.

Spiced chocolate truffles

125 g dark chocolate
125 g milk chocolate
1/2 dl light cream
juice of one orange
75 g sugar
50 g butter

flavouring options for 1/3 of the mixture
1/4 tsp ground aniseed
1/8 tsp ground allspice
1/4 tsp ground nutmeg
1/4 tsp ground cloves
1/4 tsp ground cinnamon + 1/8 tsp ground cardamom
1/2 tsp Cointreau

coating
about 250 g dark chocolate
50 g milk chocolate, powdered sugar, cocoa powder, cloves, aniseed, nuts...
  1. Break chocolate to pieces
  2. Bring cream, orange juice and sugar to a boil together and add to the chocolate, stirring until incorporated well.
  3. Add butter and mix well.
  4. Divide the mixture into 3 parts and choose a flavouring option for every one of them. Let the new mixtures stand in the fridge for some 30 minutes.
  5. Make balls or other shapes (you might want to distinguish the different flavours) of the mixtures and let them harden in the fridge.
  6. Melt dark chocolate over a waterbath and dip all the truffles into the chocolate, then let them harden on a non-stick surface like foil.
  7. Decorate truffles with different flavour differently. You can roll them in powdered sugar or cocoa powder or decorate them with melted milk chocolate. Before hardening you can add cloves on top of clove truffles, aniseed on top of aniseed truffles or just different nuts.

I made truffles flavoured with aniseed, cloves and cardamom/cinnamon. Loved them all! The flavours came through very well and I just couldn't help but pick the aniseed ones.
I really liked the softer filling and it surprised me every time I bit into a truffle. All the superhigh gigaquality truffles that cost a lot of money are usually a lot harder to bite in, for whatever reason. Everyone needs a change, right?

But it was a bit hard to form the balls so I kept running between the stove and the freezer! I guess it's good to combine running with chocolate once in a while...

Saturday 5 January 2008

The darkest spicy tipsy apples

Or, at first glance, more like beets with stalks on.

There must be a heap of recipes for pears in wine on the Internet and everywhere and everywhere, especially around Christmas holidays and New Year's Eve. Yet I'm here. Hmmm... but probably just because my apples turned out very cool-looking.

I don't have exact measurements, unfortunately. I used little-ish homegrown apples and threw in...everything. Feel free to use pears instead.


Spicy apples in red wine and blackcurrant juice

Apples (I had 10 small ones)
About 1/2 l of blackcurrant juice
About 7 dl of red wine
1 vanilla bean
cloves, about 10
1 star anise
1 cinnamon stick
  1. Take a pot large enough to fit all the apples onto the bottom of it.
  2. Add all ingredients (but not the apples) to the pot and bring to a boil.
  3. Meanwhile peel the apples, but leave their stalks on. Cut the core out from the bottom and also cut a slice off the bottom so that they stand better.
  4. Add the apples to the pot and boil them at low heat for about 30 minutes, until tender. As the liquid probably doesn't cover all the apples, turn them around for some times to get an even colour.
  5. Remove from heat and let the apples cool in the poaching liquid.
  6. Serve with vanilla sauce.

Blackcurrant juice is a strong flavourer. The apples do look like beets, but taste a lot like a lighter version of spiced blackcurrants. Tender, juicy. Screaming for vanilla sauce. They're as dark as it gets.

I guess it was the perfect dessert for surprising my granny. She knows how to prepare stunning dishes out of nothing, but after so many years of eating and cooking apples... who could have thought to throw the apples into some juice?

Thursday 3 January 2008

A tortilla that’s not a real tortilla and definitely not a tortilla that I’d call a tortilla

I love reading foreign food magazines. That I can read. But usually buying them aqcuires a thick wallet. When we went to Spain last autumn, I grabbed four food magazines when we were still at the airport. Well, I rushed a bit with that...as I acidentally grabbed one in Catalan...


But this year a friend gave me a three month subcription of the Spanish food magazine Comer Bien for birthday. Yay. That was sweet! Believe me, I’ve ticked a lot of recipes, but this far I’ve only got to making just one thing from all my Spanish magazines...


And in case you’re not fond of the word omelette in this context, well, you can call it a heated dessert or something:)

<Chocolate omelette
(adapted from Comer y Beber magazine, October/November 2006, serves 4)

4 eggs
100g sugar
100g dark chocolate
2 tsp cocoa powder

  1. Break chocolate into squares.
  2. Beat the eggs together with the sugar until slightly fluffy.
  3. Sift in cocoa powder and add chocolate chunks.
  4. Prepare an omelette from the mixture on a larger skillet (Do not overbake, or the chocolate inside won't be runny anymore). Cut into four.
  5. Serve alone or with a sauce. I'd recommend vanilla sauce or some fruit sauce.


I used a small skillet for making the dessert for just two people and it was so easy to make. Warm chocolate desserts usually take time, but this one is ready in minutes. The flavour is eggy, yes, but it doesn't really taste like an omelette. Creme brulee tastes eggy too, remember?

It's definitely mainly a chocolate dessert, with the chocolate chunks inside pleasantly warm and slightly runny.

You hungry?

Tuesday 1 January 2008